
Install Your Gate Latch Pull In About 10 Minutes.
The GH Gate Latch Pull is designed for straightforward homeowner installation using common tools. Follow the steps below to measure, cut, assemble, and connect your new gate pull.
- Approx. 10-minute installation
- Wire crimping tool required
- Do not use pliers to crimp

Gather your tools and inspect the gate.
Confirm that your gate uses a standard gravity latch and identify a clear drilling location through the gate post. Read through all steps before cutting the tube or wire.
Do not use ordinary pliers to crimp the fitting. A proper wire crimping tool is required to securely install the end crimp.
Eleven steps from box to finished gate.
Work carefully when drilling and cutting. Take all measurements directly from your gate before trimming the tube or wire.
-
01

Separate the Components
Separate the base and cap assembly from the tube and end cap.
-
02
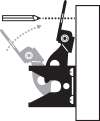
Mark and Drill the Hole
Temporarily attach the lever without fully tightening it. Use the lever position to mark the drilling location.
Remove the lever and drill a 5/8-inch or 16 mm hole through the gate post at the marked location.
-
03
Insert the Tube
Insert the tube through the drilled hole with the end cap still attached.
-
04
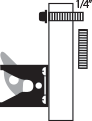
Measure and Cut the Tube
Measure approximately 1/4 inch or 6 mm beyond the edge of the gate post.
Mark the tube and cut it at that point using a hacksaw.
-
05
Remove the Trimmed Tube
Pull the tube back out of the drilled hole after completing the cut.
-
06

Secure the Lever
Attach the lever using the supplied nut, washer, and bolt.
Tighten the assembly securely.
-
07
Reattach the Base Cap
Remove the end cap and reattach the base cap through the tube.
-
08

Reinstall the Tube
Push the assembled tube back through the hole in the gate post.
Reattach the end cap on the opposite side.
-
09
Thread the Wire
Feed the wire through the opening in the lever.
-
10
Crimping Tool Required
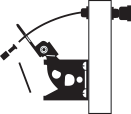
Crimp and Trim the Wire
Slide the end crimp onto the wire with the flange side entering first.
Use a proper wire crimping tool. DO NOT USE PLIERS.Securely crimp the fitting with the proper crimping tool, then cut away the excess wire, leaving approximately 1/4 inch or 6 mm beyond the lever.

-
11
Install the Rubber Cap
Press the rubber cap over the end crimp to complete the installation.
Measure Before Cutting
Gate-post dimensions can vary. Always test-fit the tube and measure against the actual post before making the final cut.
Crimping Tool Required
DO NOT USE PLIERS.Use a proper wire crimping tool to secure the end crimp. Ordinary pliers will not provide the proper crimp for this installation.
Test the Latch
Open and close the gate several times after installation to confirm that the pull moves freely and completely releases the gravity latch.
Take the instructions to the gate.
Download the original printable installation sheet and keep it nearby while measuring, drilling, crimping, and assembling your latch pull.
Remember: A proper wire crimping tool is required. Do not use pliers.
Stop reaching over the fence.
Install a purpose-built gate latch pull and open your gate comfortably from either side.
Shop Gate Latch Pulls